
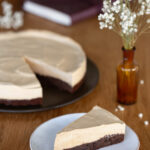
This coffee mousse cake on a brownie base is a delightful coffee cake recipe that combines the soft and airy texture of a coffee mousse with a sticky chocolate brownie base. The cake is infused with the flavour of coffee both in the mousse filling, where coffee is the main theme, as well as in the brownie base.
The first time I tested this recipe I was amazed by the coffee mousse cake filling, as the flavour hit me with a childhood memory. There is a packaged ice cream in Italy called "Coppa del Nonno" that is coffee flavoured and I would swear it tastes just like this coffee cake. I don't know when was the last time I ate a Coppa del Nonno, but it must have been some solid 25 years ago. So reliving this flavour was a pleasant experience.

If you're a fan of coffee flavoured desserts, you must try this coffee mousse cake on brownie base. Read on for a detailed explication of the recipe, and find more coffee flavoured desserts at the end of this post!
Ingredients and equipment

- Cream - heavy whipping cream, at least 35% fat (best is 40%)
- Powdered sugar - this will go in the mousse
- Gelatin sheets - you will need a minimal amount for the mousse to set
- Instant coffee - I prefer the one that is in powder, not granules
- Butter - please notice that I use salted butter. If using unsalted, factor in a sprinkle of salt to balance the sweetness
- Dark chocolate - I recommend 70% cocoa
- Granulated sugar - this sugar is for the brownie base
- Eggs
- Flour
The brownie base is very easy to make, as it doesn't require the use of an electric mixer as all is mixed by hand, so for that you will need a bowl and a hand whisk. You need to melt the butter and the chocolate, so either the microwave or a saucepan (I use the microwave on a low setting, check and stir every minute. I melt the chocolate and butter together).
For the coffee mousse you will need to whip the cream, and for that I have used an electric mixer. A bowl to bloom the gelatin in and a saucepan to warm a part of the cream. A larger bowl for an ice bath if you want to speed up the cooling process.
How to make coffee mousse cake
This cake requires 2 moments. I generally make the brownie base the day before and let it set and cool down completely before I start with the coffee mousse. I recommend you do this if you have time. Otherwise you need to factor in the cooling time for the base as extra time.
For the brownie base

1. Add the butter and the chocolate to a bowl. Microwave on low until melted. Whisk together, then whisk in the instant coffee and the granulated sugar.

2. Whisk in the eggs, one at a time. Lastly, whisk in the flour. Transfer to a springform pan lined with baking paper.

3. Bake in the preheated oven at 170C (338F) for 20 minutes. Take out, transfer to a cooling rack and let come to room temperature.
For the coffee mousse

4. Place gelatin sheets in a bowl, cover with cold water and let bloom for 5 minutes. Pour 100 ml of cream into a saucepan and set on medium heat. When the cream is steaming and about to boil remove it from the heat. Whisk in the instant coffee and the drained bloomed gelatin. Cool to lukewarm (an ice water bath will speed up the process).

5. Combine the rest of the cream with the powdered sugar and start whisking at medium-low speed, either with a hand mixer or a stand mixer. When the cream is about to reach soft peaks, slowly pour in the coffee and gelatin mix always mixing at low speed. The mixture will loosen only to get fluffy again, stop when at soft peaks.*

6. Place cooled brownie base back into springform pan. Line pan sides with a cake collar for easier removing. Pour cream mixture onto brownie base and gently distribute all over with a spatula so it reaches all the edges. Do not push too hard or it may deflate. Transfer to the fridge to set for a minimum of 2 hours.
* For aesthetic reasons I photographed adding the coffee gelatin cream to the whipped cream while the cream is not being beaten. This is an artistic statement, but please notice that you must incorporate the gelatin mixture while you are whipping the whipped cream at low speed, as per written instructions. This will ensure optimal incorporation.
Coffee mousse cake recipe tips
This is a cake that you can enjoy either chilled or frozen. It needs to be refrigerated at all times, and tastes great straight out of the fridge. Its texture is softer, and the brownie base is sticky and decadent. Chilled is probably the best way to truly enjoy the flavours and textures. But slicing this cake when chilled is challenging, as the brownie is very sticky.
Pop this cake in the freezer overnight and you get a totally different experience. The mousse filling will not be as creamy, but given its airy texture, it will not harden completely. So while you will not cut through it as easily with a spoon, it will be perfect to bite. The brownie base is firmer and not as sticky, making for easier portioning when slicing it with a knife.
My pro tip is: after enjoying the cake for a day or two, put leftovers in the freezer. Then you can just cut out a slice (from frozen) whenever you feel like having some. Then you can choose if you want to eat it like an ice cream sandwich, and bite straight into it. Or let it come to fridge temperature and enjoy it with a spoon, like a regular slice of cake. This way you are also extending its shelf-life by keeping it frozen, and only taking out a portion at a time. Perfect!

More coffee flavoured treats!
Here are some more delicious treats to enjoy on a warmer day, with a coffee theme! Classic tiramisù features real coffee. My coffee panna cotta is made with instant coffee, just like this cake. Another nice way to use up coffee beans is to make a cold brew flavoured latte. And did you know that cold coffee is an ingredient in Swedish chocolate balls? Click on the pictures below to access other exciting recipes!




If you tried this recipe, let me know your thoughts in the comments. If you're planning to try it another time, pin this recipe to Pinterest. Please consider subscribing to my newsletter and following me on Instagram and on Pinterest.


Coffee mousse brownie cake
Equipment
- Bowls
- Whisk
- Electric mixer
- Springform pan (24 cm)
Ingredients
- 500 ml cream
- 90 g powdered sugar
- 5 g gelatin sheets
- 3 tablespoon instant coffee divided
- 150 g granulated sugar
- 120 g dark chocolate
- 120 g butter
- 2 eggs
- 60 g flour
Instructions
Brownie base
- Melt the butter and the chocolate, either in a saucepan or in the microwave at low, stirring every other minute. Transfer to a bowl and whisk together. Whisk in the instant coffee powder and the granulated sugar.
- Whisk in the eggs, one at a time. Lastly, whisk in the flour. Transfer to a springform pan lined with baking paper.
- Bake in the preheated oven at 170C (338F) for 20 minutes. Take out, transfer to a cooling rack and let come to room temperature. Best to make this step ahead and let the brownie cool overnight.
Coffee mousse
- Place gelatin sheets in a bowl, cover with cold water and let bloom for 5 minutes. Pour 100 ml of cream into a saucepan and set on medium heat. When the cream is steaming and about to boil remove it from the heat. Whisk in the instant coffee and the drained bloomed gelatin. Cool to lukewarm (an ice water bath will speed up the process).
- Combine the rest of the cream with the powdered sugar and start whisking at medium-low speed, either with a hand mixer or a stand mixer. When the cream is about to reach soft peaks, slowly pour in the cooled coffee and gelatin mix and mix in at low speed. The mixture will loosen only to get fluffy again, stop when at soft peaks again.
- Place cooled brownie base back into springform pan. Line pan sides with a cake collar. Pour cream mixture onto brownie base and gently distribute all over with a spatula so it reaches all the edges. Do not handle too much or it may deflate. Transfer to the fridge to set for a minimum of 2 hours.
Notes
- This cake must be stored chilled at all times. You can also store it in the freezer, then it will be easier to cut into portions. You can then enjoy it frozen or let it come to fridge temperature before serving.
- The nutritional information provided is made with an online calculator and only meant to be used as a guideline.


