
This no-bake chocolate and raspberry cheesecake is a decadent dessert that combines two flavours that, to me, are just meant to go together forever and always: chocolate and raspberries. The chocolate raspberry combo is divine. The richness and bitterness of chocolate is such a delicious counterpart to the aromatic tartness of the raspberries.
The fantastic flavours of the main ingredients here are combined with that of cream cheese, its mild tang that is signature in cheesecakes. Chocolate features in the cheesecake filling, working in close contact with the cheese, and on the top as a smooth ganache. The raspberries feature as topping, both in the form of a fruit jelly and as crispy freeze-dried bits.

In order to achieve the various textures that make up this chocolate and raspberry cheesecake, there are a few steps we need to take in the right order. But I promise that your patience will be greatly rewarded once you serve yourself a slice of this divine goodness.
Ingredients and equipment

What you will need to make this raspberry chocolate cheesecake is:
- Oreo cookies
- Cream cheese
- Whipping cream
- Gelatin sheets
- Dark chocolate (min 45% cocoa)
- Powdered sugar
- Butter
- Raspberry jam
- Freeze dried raspberries for decoration.
I like to use the microwave to heat both the jam and the cream to stir the gelatin into. I also microwave the chocolate in order to melt it: it is very important to use a low setting and check it every minute. This recipe works best in a 20 cm springform pan. A smaller pan will deliver a taller cake. A larger pan might not be big enough for both the cookie base and the raspberry jelly top to cover the whole surface. I make my cookie base in the food processor and the cheesecake filling with an electric mixer.
How to make chocolate raspberry cheesecake

1. Melt the butter in the microwave and set aside. Open each Oreo cookie and separate the biscuits from the filling. Set the filling aside and add the cookies to a food processor fitted with the rotating blades. Crush the biscuits until fine and, as the blades are still rotating, pour in the melted butter. Line the bottom of a springform pan with baking paper and the sides with a cake collar (optional). Spread biscuit mixture evenly all over the bottom of the pan. Chill in the fridge for the time being.

2. Soak half of the gelatin sheets (10 g) in cold water for 5 minutes. Gently heat the raspberry jam in the microwave, stirring from time to time, until steaming hot. The jam will loosen in texture. Squeeze excess water from the softened gelatin sheets and stir into hot jam. Set aside to cool.

3. Melt ¾ of the chocolate (150g) in the microwave at the lowest setting, checking every minute. Combine the cream cheese, powdered sugar and Oreo fillings in a bowl and mix at medium speed for 2-3 minutes, until combined and smooth. Add the melted chocolate (ideally it should not be hot but barely warm, so let it cool some before adding it). Start the mixer again and whisk it all in until smooth.

4. Soak the rest of the gelatin sheets (10 g) in cold water. Heat 100 ml of cream and stir in the soaked gelatin to melt, adding it little by little. If you notice that the gelatin does not melt immediately when about halfway, microwave the cream some more. Adding the gelatin might have cooled the cream too much to effectively melt all of the gelatin. Slowly pour the gelatin and cream mixture into the other bowl, mixing at low speed until even and combined.

5. Take the crust out of the fridge and pour in the chocolate cheesecake filling. To achieve a flat top, gently tap the pan on the countertop a couple of times. Place in the fridge for cooling about 10 minutes. Take the cheesecake out of the fridge, it will still be very wobbly, but hopefully slightly firmer. Using a spoon, pour the jam and gelatin mixture all over the surface of the cake. Return the cake to the fridge and let it set for a minimum of 2 hours (or better overnight).

6. When the cake is set, make the ganache. Warm up remaining cream and take away from the heat just before it boils. Add remaining chocolate to the cream and stir until combined. Let sit until it reaches room temperature, you can speed up the process by placing the bowl in an ice bath and stirring from time to time. When cooled to room temperature, pour the ganache over the cheesecake starting from the middle and moving in circles outwards, letting it gently drop down the sides. Decorate with freeze-dried raspberries.
Raspberry chocolate cheesecake Recipe tips
For best results, let the cake set in the fridge overnight. If you are short on time, give yourself a minimum of 3 hours: 2 for the cake to sit in the fridge before you remove it from the springform pan, and another hour for the ganache job. For the ganache to come to room temperature you can budget in about a half hour, and you'll need another half hour in the fridge after you pour the ganache over the cake. You want to make sure that the ganache has firmed up before you cut the cake.

There is an excellent wine pairing for this cake and that is Brachetto. Brachetto is a delicious dessert wine from Italy which is low in alcohol and has a lightly sparkling texture. It is a sweet red, and it pairs wonderfully with chocolate desserts. The fact that we have chocolate and raspberry here highlights even more the fruity notes of this vibrant dessert wine.
More no-bake cheesecake inspo
If you enjoyed this no-bake cheesecake recipe, here are more coming your way. First off, a cheesecake with jello bits that deliver a lovely mosaic effect. Then we have two fruity ones: one with raspberry and a hint of chili, and one that combined blueberry and white chocolate. Lastly, another cheesecake that features Oreos, if you want more of that. Just click on the pictures below to access more recipes!


If you tried this recipe, let me know your thoughts in the comments. If you're planning to try it another time, pin this recipe to Pinterest. Please consider subscribing to my newsletter and following me on Instagram and on Pinterest.


This post was originally published in February 2019. The recipe has been significantly modified and the post rewritten (with new photos retaken) in May 2026.
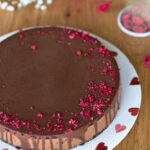
No-bake chocolate raspberry cheesecake
Equipment
- Electric mixer
- Bowls of various sizes
- Microwave
- Food processor
- Springform pan 20cm (8in)
Ingredients
- 14 Oreo cookies 1 package
- 60 g butter
- 300 g cream cheese
- 120 g powdered sugar
- 230 g dark chocolate 50% cocoa
- 135 g raspberry jam
- 250 ml heavy cream
- 20 g gelatin sheets
- 2 tablespoon freeze-dried raspberries
Instructions
- Melt the butter in the microwave and set aside. Open each Oreo cookie and separate the biscuits from the filling. Set the filling aside and add the cookies to a food processor fitted with the rotating blades. Crush the biscuits until fine and, as the blades are still rotating, pour in the melted butter. Line the bottom of a springform pan with baking paper and the sides with a cake collar (optional). Spread biscuit mixture evenly all over the bottom of the pan. Chill in the fridge for the time being.
- Soak half of the gelatin sheets (10 g) in cold water for 5 minutes. Gently heat the raspberry jam in the microwave, stirring from time to time, until steaming hot. The jam will loosen in texture. Squeeze excess water from the softened gelatin sheets and stir into hot jam. Set aside to cool.
- Melt ¾ of the chocolate (150g) in the microwave at the lowest setting, checking every minute. Combine the cream cheese, powdered sugar and Oreo fillings in a bowl and mix at medium speed for 2-3 minutes, until combined and smooth. Add the melted chocolate (ideally it should not be hot but barely warm, so let it cool some before adding it). Start the mixer again and whisk it all in until smooth.
- Soak the rest of the gelatin sheets (10 g) in cold water. Heat 100 ml of cream and stir in the soaked gelatin to melt, adding it little by little. If you notice that the gelatin does not melt immediately when about halfway, microwave the cream some more. Adding the gelatin might have cooled the cream too much to effectively melt all of the gelatin. Slowly pour the gelatin and cream mixture into the other bowl, mixing at low speed until even and combined.
- Take the crust out of the fridge and pour in the chocolate cheesecake filling. To achieve a flat top, gently shake the springform pan and tap the pan on the countertop a couple of times. This might even cause some air bubbles to come to the top. Place in the fridge for cooling about 10 minutes.
- Take the cheesecake out of the fridge, it will still be very wobbly, but hopefully slightly firmer. Using a spoon, pour the jam and gelatin mixture all over the surface of the cake. Return the cake to the fridge and let it set for a minimum of 2 hours (or better overnight).
- When the cake is set, make the ganache. Warm up remaining cream (150 ml) and take away from the heat just before it reaches boiling temperature. Add remaining chocolate (80 g) to the cream and stir until combined. Let sit until it reaches room temperature, you can speed up the process by placing the bowl in an ice bath and stirring from time to time. When cooled to room temperature, pour the ganache over the cheesecake starting from the middle and moving in circles outwards, letting it gently drop down the sides. Decorate with freeze-dried raspberries. Let the ganache set in the fridge before cutting.
Notes


This looks so delicious! I'm saving it to make it as soon as possible!
Thanks dear!